I made this bag for my 12 year old daughter. The ladies at my local yarn shop (LYS), Heavenly Creations, liked it so much they asked for the pattern.
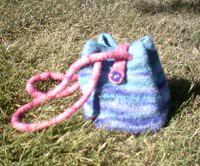
Felted Crochet Booga Bag
The bottom of this bag is a solid granny square, which creates a spiral effect when using an omber or variegated yarn. Using a J hook will result in loose stitches that will tighten up during the felting process.
Skill level: Easy
Gauge: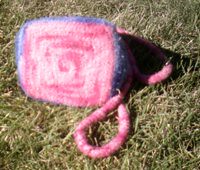
6 rows = 2", 7 sts = 2"
Gauge isn't important for this pattern.
Finished size approx 6" wide by 6" deep by 10" high, depending on felting.
Materials needed:
Hooks
6.0 mm (US J or 10)
3.5 mm (US E or 4)
Yarns
Brown Sheep Lanaloft Worsted Weight, one 100g ball of each color (160 yds per skein)
Color A - Mystic Pink #LL90W
Color B - Rain Drop #LL93W
Color C - Turquoise Magi #LL92W
Finishing materials
Yarn needle to weave in ends
Coordinating button
Sewing needle and thread to attach button
Abbreviations
st = stitch
sc = single crochet
sl st = slip stitch
ch = chain
Directions:
Body
With J hook, using Color A ch-2
Row 1 - 8 sc into first stitch, sl st into top of ch-1 to join (8 sc)
(See note**)
Row 2 - ch-1, sc into same st, 2 sc into each remaining st, sl st into the top of the ch-1 to join (16 sc)
Row 3 - ch-1, sc into next 2 st, *ch-2, sc into next 4 st* 3 times, ch-2, sc into next st, sl st into the top of the ch-1 to join (16 sc)
Row 4 - ch-1, sc into next 2 st, sc into ch loop, *ch-2, sc into ch loop, sc into next 4 st, sc into ch loop* 3 times, sc into next st, sl st into the top of the ch-1 to join (24 sc)
Row 5 - ch-1, sc into next 3 st, sc into ch loop, *ch-2, sc into ch loop, sc into next 6 st, sc into ch loop* 3 times, sc into next 2 st, sl st into the top of the ch-1 to join (32 sc)
Row 6 - ch-1, sc into next 4 st, sc into ch loop, *ch-2, sc into ch loop, sc into next 8 st, sc into ch loop* 3 times, sc into next 3 st, sl st into the top of the ch-1 to join (40 sc)
Row 7 - ch-1, sc into next 5 st, sc into ch loop, *ch-2, sc into ch loop, sc into next 10 st, sc into ch loop* 3 times, sc into next 4 st, sl st into the top of the ch-1 to join (48 sc)
Row 8 - ch-1, sc into next 6 st, sc into ch loop, *ch-2, sc into ch loop, sc into next 12 st, sc into ch loop* 3 times, sc into next 5 st, sl st into the top of the ch-1 to join (56 sc)
Row 9 - ch-1, sc into next 7 st, sc into ch loop, *ch-2, sc into ch loop, sc into next 14 st, sc into ch loop* 3 times, sc into next 6 st, sl st into the top of the ch-1 to join (64 sc)
Row 10 - ch-1, sc into next 8 st, sc into ch loop, *ch-2, sc into ch loop, sc into next 16 st, sc into ch loop* 3 times, sc into next 7 st, sl st into the top of the ch-1 to join (72 sc)
Row 11 - ch-1, sc into next 9 st, sc into ch loop, *ch-2, sc into ch loop, sc into next 18 st, sc into ch loop* 3 times, sc into next 8 st, sl st into the top of the ch-1 to join (80 sc)
Attach Color B
Row 12-16 - ch-1, sc into next 87 st, sl st into top of ch-1 to join (88)
(See note ***)
Attach Color C
Row 17 - ch-1, sc into next 87 st, sl st into top of ch-1 to join (88)
Change to Color B
Row 18-21 - ch-1, sc into next 87 st, sl st into top of ch-1 to join (88)
Change to Color C
Row 22-23 - ch-1, sc into next 87 st, sl st into top of ch-1 to join (88)
Change to Color B
Row 24-26 ch-1 sc into next 87 st, sl st into top of ch-1 to join (88)
Change to Color C
Row 27-29 - ch-1, sc into next 87 st, sl st into top of ch-1 to join (88)
Change to Color B
Row 30-31 - ch-1, sc into next 87 st, sl st into top of ch-1 to join (88)
Change to Color C
Row 32-35 - ch-1, sc into next 87 st, sl st into top of ch-1 to join (88)
Change to Color B
Row 36 - ch-1, sc into next 87 st, sl st into top of ch-1 to join (88)
Change to Color C
Row 37 - ch-1, sc into next 2 st, *ch-3, skip next 3 st, sc into next 8 st* 7 times, sc into next 5 st, sl st into top of ch-1 to join (88) (to form holes for i-cord handle)
Row 38-40 - ch-1, sc into next 87 st, sl st into top of ch-1 to join (88)
Row 41 - ch-1, sc into next 87 st, sl st into top of ch-1 to join, fasten off, weave in ends (88)
Flap
With J hook, using Color A ch 5, leave a 6-8" tail for finishing.
Row 1 - sc into 2 from hook, sc in next 3, ch 1, turn (4)
Row 2-10 - 4 sc, ch 1, turn (4)
Row 11 - sc, ch-2, skip 2 st, sc, ch 1, turn (to form button hole)
Row 12 - 4 sc, fasten off, weave in this end only.
I-Cord
With E hook, using Color A ch-4, sl st in the first stitch to form a ring,
sc into the ring 6 times, do not turn
sc into the top of the first sc of row one to start a spiral, sc in each st, spiraling around until you reach the length desired. Fasten off, leave tail for finishing.
Tip: Use a scrap of yarn in a contrasting color to mark each row if you are worried about missing a stitch.
(http://crochetme.com/tips/i-cord-crochet-way)
Finishing
Use tail of flap to sew it to the top, center of the back side of body. Weave in end.
Pleat the sides of the body and line up the holes in row 38. Thread i-cord through holes, sew the ends together to form a loop.
Felt in washing machine until desired effect is achieved checking it often to prevent overfelting. Shape the bag while still wet and allow to air dry. Drape the bag over a plastic covered cracker box or other box that will help the bag hold its shape while it dries.
Sew a coordinating button on to front of purse so it lines up with the button hole of the flap.
Notes
** Alternately, form an adjustable ring (see tutorial at http://www.crochetme.com/Dec_Jan_0405/reads_round.html), 8 sc into the ring, sl st into top of first sc to join (8)
*** You can either fasten off at each color change and weave in the ends, or leave both colors attached, pulling the new color up along the inside of the bag to hide the seam. Be careful not to pull the yarn too tight using this method or the finished bag will be misshapen. I prefer this method because it uses less yarn and weaving in ends is one of my least favorite parts of crochet.
This is the first time I have written out one of my designs. Feel free to contact me with any questions or corrections.
Thanks for stopping by!


